🎬 The Plan #
I’m dubbing this setup and its configuration ✨ MANS ✨, Muffin’s Awesome NAS Stack.
This post covers the setup/methodology and conclusion, with detailed Ansible documentation following in Part 4. I’ve attempted to design and explain this in such a way as to make repeatable to anyone that would like a setup similar to this, as I believe it is something that some may want but perhaps don’t know it yet. It is, of course, entirely possible that I have made this overly complicated, alas.. The repo is located here if you’re interested in it now:
I wanted to utilise tools freely available to get the most out of what I have just built. The goal of this storage server/NAS was primarily bulk storage that is seldom changed, written once and read from infrequently, ‘Linux ISOs’. The rest of the storage is either replicated backup, or hot NFS/iSCSI shares.
ZFS for the bulk media storage is overkill for the home user/enthusiast IMO. Over the years I have grown to respect ZFS, I trust my most important data and memories with it, but 100+TB of ZFS for re-obtainable ‘Linux ISOs’ is not efficient. I’ve run somewhat large ZFS arrays before (linked below), and I cannot fault its resilience, but it is not an efficient use of space and power. Having run 40+ disk ZFS arrays for nearing 10 years now (just saying that makes me feel like a fossil) I wanted a change.
One of the main drivers behind this redesign was space efficiency. If you read about ZFS, you will quickly be told to plan your pools at the start, because adding more capacity to existing pools has historically been a major pain point.
I want expansion. I want to be able to be able to add one single disk, and have it add capacity to a pool whilst still retaining some redundancy with minimal config and downtime.
So… I didn’t want ZFS (when I am speaking of ZFS here, I am talking about the redundancy commonly used with the file system itself,) but I did want ZFS in some parts, because I would also be rsync’ing as a backup to the SSD array and that was a perfect contender for ZFS.
Most people gravitate towards solutions such as the freely available Openmediavault or the oh so popular Unraid to achieve what I am essentially going to be doing. While Unraid and OMV could cater to my bulk storage needs, they also come with certain compromises. Also, I’m just not going to pay for Unraid when I can do it myself better, for free.
💡 Methodology #
There are a few bits of FOSS software required that all fit together to create this setup. Below are the main bits of software that I used. This sits on top of a clean, headless Debian install. Why Debian? Well..
Debian #
I did initially try and do this on Ubuntu server 22.04 as that was my preferred server OS at the time, however, I kept having an odd issue when creating ZFS arrays. It would continually fail due to MDADM using the disks mid-array creation. Absolutely nothing I did would stop this from happening, blacklisting all the disks, attempting to disable MDADM etc, it just wasn’t having it.
I would continue to see the following error when attempting to deploy via ansible.
    "msg": "non-zero return code",
    "rc": 1,
    "start": "2023-10-15 23:27:38.868075",
    "stderr": "invalid vdev specification\nuse '-f' to override the following errors:\n/dev/disk/by-id/ata-SAMSUNG_MZ7LE1T0HCHP-00000_S1XANXAGC01054-part1 contains a filesystem of type 'linux_raid_member'\n/dev/disk/by-id/ata-SAMSUNG_MZ7LE1T0HCHP-00000_S1XANXAH200036-part1 contains a filesystem of type 'linux_raid_member'\n/dev/disk/by-id/ata-SAMSUNG_MZ7LE1T0HCHP-00000_S1XANXAH300674-part1 contains a filesystem of type 'linux_raid_member'",
    "stderr_lines": [
        "invalid vdev specification",
        "use '-f' to override the following errors:",
        "/dev/disk/by-id/ata-SAMSUNG_MZ7LE1T0HCHP-00000_S1XANXAGC01054-part1 contains a filesystem of type 'linux_raid_member'",
        "/dev/disk/by-id/ata-SAMSUNG_MZ7LE1T0HCHP-00000_S1XANXAH200036-part1 contains a filesystem of type 'linux_raid_member'",
        "/dev/disk/by-id/ata-SAMSUNG_MZ7LE1T0HCHP-00000_S1XANXAH300674-part1 contains a filesystem of type 'linux_raid_member'"
    ],
    "stdout": "",
    "stdou
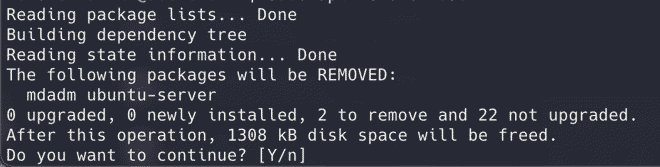
So, reasonably I thought I would simply remove MDADM as I don’t need it anyway, however…

SnapRAID #
A backup program for disk arrays. It stores parity information of your data and it recovers from up to six disk failures
SnapRAID offers a less traditional approach to RAID software. It’s tailor-made for large amounts of data that remains static for the most part. The beauty of Snapraid is that it doesn’t require a consistent runtime to function, instead it operates based on snapshots.
-
Data disks can continually be added at will, even differently sized disks, so long as the parity disk is as large as the largest data disk. Simply add the disk, change the config to reflect this and recompute the parity.
-
It is very easy to add or subtract parity disks without needing to do any significant reshuffle. As above, simply change the config and recomputing parity.
-
Snapraid’s parity system is unlike most other systems where there’s a constant overhead of managing the parity. Snapraid only calculates parity as it is told to, which is typically during snapshots.
-
Snapraid doesn’t eat into storage with excessive metadata or redundancy data (unless you want it to). This means more of the disk space is reserved for what it should be, data.
-
In the event that multiple disks fail and a parity recovery isn’t possible, only the data on the affected disks is lost. Unlike other RAID configurations where a couple of failed disks means loss of the entire array. This is perfect for data that is “obtainable” again.
-
Snapraid does not care about existing data on disks, or even existing filesystems. If the system can read the disk then Snapraid can compute file based parity.
TL;DR: Snapraid is a ‘point in time’ parity system that is extremely flexible in how it is can be setup and run.
Due to how Snapraid generates its parity, data remains unmanipulated or unstriped. Thus, in the event of a major disk failure where recovery isn’t possible, data on the surviving disks remains intact. For me, this is a significant benefit, though it presents a challenge in managing files, a task handled by MergerFS and its policies.
snapraid-btrfs #
Script for using snapraid with btrfs snapshots
I plan to use btrfs on all data disks to utilise the snapshot feature of the btrfs filesystem.
A limitation of SnapRAID’s ‘point in time’ parity creation is that it doesn’t immediately protect newly added files. Moreover, it creates a “write hole”, where redundancy is jeopardized for certain files sharing the same parity blocks if modifications occur before another sync. This is less of an issue for file systems that aren’t under constant writes, but it does present an issue. Generally, it is recommended to not write data to disks when parity is being calculated to combat this, but there is a better way: btrfs snapshots.
The snapraid-btrfs scripts harnesses the snapshot capability of btrfs during operations such as snapraid sync or snapraid scrub, creating read-only snapshots of the btrfs file system on the data disks. This approach ensures that any post-sync modifications or deletions won’t disrupt the system’s restoration ability to its original state.
What this is essentially doing is creating RO snapshots of the filesystem, on the fly modifying snapraid’s configuration to point to these snapshots and then running a snapraid sync, essentially doing a parity calculation on the snapshots without needing to worry about writing new files to the disks during a sync.
mergerfs/caching #
a featureful union filesystem
MergerFS is a very powerful union filesystem. It will be used in this project to ‘pool’ the disks together to show as one unified glob of storage, ala RAID. MergerFS uses storage policies to define how data is put on the individual disks, and it is these policies that allow for the setup I am trying to achieve.
Snapraid only deals with calculating parity on disks you tell it about, it does not present any data, this is why I am using mergerfs to abstract multiple disks behind one mount.
I will have two mergerfs pools. One which will have all the data disks that will store mostly static data, data which will be protected via snapraid parity.
The second pool will contain the same disks as above, but will also include the NVMe disk added in the previous post. This pool will be the one presented to applications and via shares. When this pool is written to, a mergerfs policy on this pool’s config will ensure all data is written to the NVMe disk, acting as write cache.
This will make sure that I have no write penalty when writing new data, and reading new data when it is initially ingested into applications will be as fast as possible. This is beneficial as, for example, when new ‘ISOs’ are added, Plex will do analysis on these files for processing, disk intensive tasks which reading from an NVME SSD will benefit from. This allows me to maximize use of the 10Gb/s network these machines are connected to.
I have created a script for moving this ‘cached’ data to the backing data disk pool, this is explained below.
The cached pool will use the ff policy.
ff #
The ‘ff’ (First Found) policy writes data to the first disk in the list where the operation can successfully complete. By ordering the NVMe disk first in the config, any data written to the pool will be written to the NVMe.
This gives me the r/w caching that I am after. As explained above, this caching is only for new files to the filesystem, there is nothing fancy happening here like caching frequently used files or anything of the sort.
mfs vs epmfs #
Typically the mfs policy is used for situations such as the bulk data pool, but epmfs is better in my opinion.
The mfs policy (Most Free Space,) aims to balance the free space across all disks. It does this by always writing new data to the disk with the most free space available.
Although this evenly utilises all disks, it poses significant drawbacks for specific use cases, such as mine. For media collections, where related files (like episodes of a TV show) are often accessed together, mfs can scatter these files across multiple disks. For example, if you have four seasons of a TV show, each season’s episodes might end up on a different disk. This scattering can lead to:
- Inefficient Retrieval: Accessing a full season might require spinning up multiple disks, more power usage, wear on drives.
- Organizational Nightmare: Having related files spread out is cumbersome for working on data expected to be together. If I did lose a drive and could not recover with parity, it would be easier to re-obtain a small chunk of similar data as opposed to possibly 1000s of random files.
The epmfs policy (Existing Path, Most Free Space) instead works as follows:
- Existing Path Priority: If a directory already exists on one of the disks, new files destined for that directory will be placed there. This ensures that related files, like episodes of the same TV show season, stay together on the same disk as long as there’s space.
- Most Free Space for New Paths: If the directory doesn’t exist on any disk (for instance, when adding a new TV show or a new season), the directory will be created on the disk with the most free space. This helps in balancing the overall storage utilization across disks.
The epmfs policy combines the best of the two options. It keeps related files together for clarity, while still ensuring that disk space is utilised effectively, and so it is what I am using on my data pool.
ZFS #
OpenZFS on Linux and FreeBSD
Most of my ZFS usage has been using TrueNAS, I have been shifting over to TrueNAS scale for some time now and it only made sense to remove the middle man and just use ZFS straight on Linux. I’d be using ZFS on the array of SSDs, both SATA and NVMe.
There’s nothing to really mention here, ZFS is ZFS, and it’s awesome.
Overview #
Here is everything at a high level:
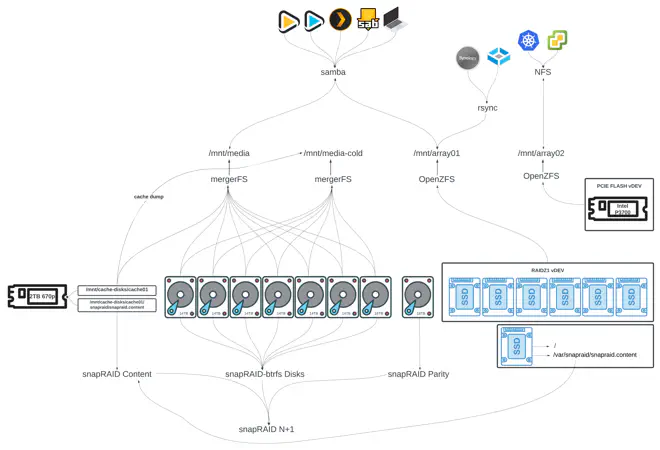
🚅 Cache Mover #
Since all new files are placed on a separate cache disk, I need a method to transfer these files from the cache to the main data pool, which I’ve dubbed ‘media-cold’. You can see this illustrated in the diagram above.
There are a few examples from trapexit themself, but I wanted more flexibility so wrote my own.
Python script for moving files on a cached disk to a backing pool with mergerFS
What I ended with is a Python script that runs periodically using systemd timers. It checks the total usage of the cache disk itself every 6 hours and, if above a certain threshold percentage, moves the oldest files to the backing data pool until a target threshold percentage is reached.
The move command is threaded to improve performance and I believe it works as intended… I’ve not had any issues thus far anyway.
It is variable based as much as possible and writes to a log file with log rotation.
🤖 Ansibl-ing #
As per the introduction, I wanted to ensure that this setup is deployable via Ansible using variables, making everything easily manageable and reconfigurable. I hoped it would help others to dive into a setup similar to this if it was as easy as setting some variables and running a playbook.
I think I did achieve this goal, and my setup was deployed entirely by Ansible, OS configuration, disk setup, shares, application and configurations. Again, this is all explained in depth in part 4, which may or may not be finished by the time you’re reading this 🙃.
What I ended up with is a playbook with several roles that, when configured correctly and run should setup the following in order:
- Basic Linux setup (kind of my preference to some things).
- Installing base applications.
- Optional: Sets SSH access via github keys.
- Some non-base apps, like ZSH.
- Installing base applications.
- Installs and configures Docker with Compose.
- Installs mergerfs.
- Installs snapraid.
- Installs btrfs.
- Optional: Installs and configures ZFS.
- Optional: Installs rclone.
- Manages disks.
- ‘Prepares’ the disks - checks all the disks contain the correct file systems and, if not and a flag is set, configures this including btrfs partitions.
- Checks and configures the btrfs subvolumes on data disks.
- Configures fstab to mount the data subvolumes.
- Configures fstab to mount the cache/parity partitions.
- Configures mountpoint permissions.
- Configures mergerfs.
- Configures snapraid.
- Configures SMB accounts and shares.
- Deploys and configures scrutiny.
- Deploys and configures muffin’s cache mover.
Admittedly, coding is not my strongest skill, so it took some time to get everything working. Eventually, I managed to create a functioning playbook that meets most requirements. I probably hyper fixated too much on getting too much configurable but it is what it is.
💾 Storage! #
After all that, this is what the system looks like when viewing storage. 118TB raw storage with 91TB usable, We can see here the two mergerfs pools being shown, with the cached pool being 2TB larger owing to the cache SSD.
❯ df -Th
Filesystem            Type           Size  Used Avail Use% Mounted on
/dev/sdm2             ext4           227G   15G  202G   7% /
/dev/nvme0n1p1        ext4           1.9T  599G  1.2T  34% /mnt/cache-disks/cache01
/dev/sda1             ext4            17T   13T  2.9T  82% /mnt/parity-disks/parity01
ARRAY01               zfs            4.6T  128K  4.6T   1% /mnt/array01
/dev/sdh1             btrfs           13T  8.1T  4.7T  64% /mnt/data-disks/data05
/dev/sde1             btrfs           13T   11T  2.0T  85% /mnt/data-disks/data03
/dev/sdl1             btrfs           13T  8.1T  4.8T  63% /mnt/data-disks/data04
/dev/sdf1             btrfs           13T  8.1T  4.7T  64% /mnt/data-disks/data06
/dev/sdd1             btrfs           15T  9.9T  4.7T  68% /mnt/data-disks/data07
/dev/sdg1             btrfs           13T   13T  431G  97% /mnt/data-disks/data02
/dev/sdc1             btrfs           13T   13T   65G 100% /mnt/data-disks/data01
mergerfs_btrfs_cold   fuse.mergerfs   91T   70T   22T  77% /mnt/media-cold
mergerfs_btrfs_cached fuse.mergerfs   93T   71T   23T  76% /mnt/media
🏃♂️ snapraid-btrfs-runner #
Works beautifully. Once deployed as a systemd timer I forgot about it and went to check on it a month later and it was working exactly as it was supposed to. Snaphots are being taken of my btrfs disks and the snapraid parity calculation happening based on these snapshots.
A successful snapraid sync looks something like this in the logs. I plan to get this sent to me (see todo).
[OUTPUT]      d1 26% | ***************
[OUTPUT]      d2  4% | **
[OUTPUT]      d3  8% | *****
[OUTPUT]      d4  3% | *
[OUTPUT]      d5 15% | *********
[OUTPUT]      d6 19% | ***********
[OUTPUT]      d7  0% |
[OUTPUT]  parity  2% | *
[OUTPUT]    raid  3% | **
[OUTPUT]    hash 16% | **********
[OUTPUT]   sched  0% |
[OUTPUT]    misc  0% |
[OUTPUT]             |_______________________________________________
[OUTPUT]                            wait time (total, less is better)
[OUTPUT] Everything OK
[OUTPUT] Saving state to /var/snapraid/snapraid.content...
[OUTPUT] Saving state to /mnt/cache-disks/cache01/snapraid/snapraid.content...
[OUTPUT] Verifying...
[OUTPUT] Verified /var/snapraid/snapraid.content in 0 seconds
[OUTPUT] Verified /mnt/cache-disks/cache01/snapraid/snapraid.content in 0 seconds
[INFO  ] ************************************************************
[INFO  ] Running cleanup...
[INFO  ] ************************************************************
[INFO  ] All done
[INFO  ] Run finished successfully
🏎️ Performance #
To test performance I used fio. One could argue that there is little point in benchmarking the performance of such a setup as all I’m really doing is benchmarking an SSD, and well, that’s kind of the point.
Flexible I/O Tester
Local Testing #
The following tests were performed on the array locally on the machine.
Sequential Performance #
For sequential operations, which are common when dealing with large files like media content or backups, the system shines:
Sequential Read: The array clocked in at 1664 MiB/s. For pulling data, that’s pretty damn fast and more than sufficient for streaming high-definition content or bulk data transfers.
Bandwidth (BW): 1664 MiB/s (1745 MB/s)
Input/Output Operations Per Second (IOPS): 1664
Average Latency: 600.52 µs
Maximum Latency: 55.52 ms
CPU Usage: 0.03% user and 1.80% system
Utilization: 99.95%
Sequential Write: Writing data sequentially, the system managed 588 MiB/s. While not as impressive as the read speeds, it’s still robust and ensures large file writes aren’t an issue.
Bandwidth (BW): 588 MiB/s (617 MB/s)
IOPS: 588
Average Latency: 1699.75 µs
Maximum Latency: 236.798 ms
CPU Usage: 0.37% user and 1.27% system
Utilization: 99.99%
Random Performance #
Random access patterns are more in line with a typical workload, albeit not necessarily mine.
Random Read: Here, the setup achieved 88.3 MiB/s, translating to 22.6k IOPS. In the context of small, scattered reads, this ensures that operations requiring quick access to various data points won’t bog down.
Bandwidth (BW): 88.3 MiB/s (92.6 MB/s)
IOPS: 22.6k
Average Latency: 43.93 µs
Maximum Latency: 60.276 ms
CPU Usage: 1.48% user and 4.98% system
Utilization: 99.87%
Random Write: The system posted 261 MiB/s or 66.9k IOPS. For writes that are more sporadic, typical of an active file system. These figures show that the system can handle a good deal of simultaneous operations with ease.
Bandwidth (BW): 261 MiB/s (274 MB/s)
IOPS: 66.9k
Average Latency: 14.65 µs
Maximum Latency: 22.346 ms
CPU Usage: 4.17% user and 13.57% system
Utilization: 99.98%
Network Testing #
These tests were performed on a VM on a separate machine with the two connected via a 10Gb/s network.
SMB Write Performance: The write performance over SMB reached 993 MiB/s (or 1041 MB/s).
Bandwidth: 993 MiB/s
IOPS: 254k
Latency: Avg. ~2.4 µs
CPU Usage: 7.53% user, 36.03% system
SMB Read Performance: The system achieved 1070 MiB/s (or 1122 MB/s) in bandwidth over SMB.
Admittedly, this is a bad test as most read operations are not being done from the cache, but it does show how beneficial the cache is when it’s being used.
Bandwidth: 1070 MiB/s
IOPS: 274k
Latency: Avg. ~3.3 µs
CPU Usage: 7.95% user, 28.93% system
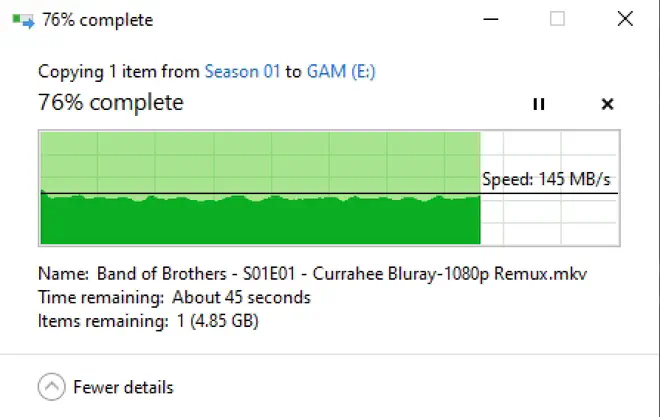
For a more realistic read task, I did a simple read from the backing rust file system using Windows and saw an average of 140MB/s, which is inline with what I would expect to see from a single spinning hard drive. Being able to read from rust at over gigabit is pretty neat though.
What This Means #
The NVMe drive at the cache layer is pulling its weight and then some, providing a substantial throughput in front of the spinning rust. While these numbers might not set world records, they’re more than enough for a homelabber like myself.
Crucially, the SMB performance tests in both read and write affirm that the system’s networked capabilities are on par with its local performance.
All in all, I would say that the cache layer implementation has been a great success. Was it necessary? Absolutely not, alas here we are.
👓 Scrutiny #
Scrutiny is great and its constant harassment of my Discord notifications is what actually alerted me to the two bad disks I bought in part 1, and replaced in part 2.
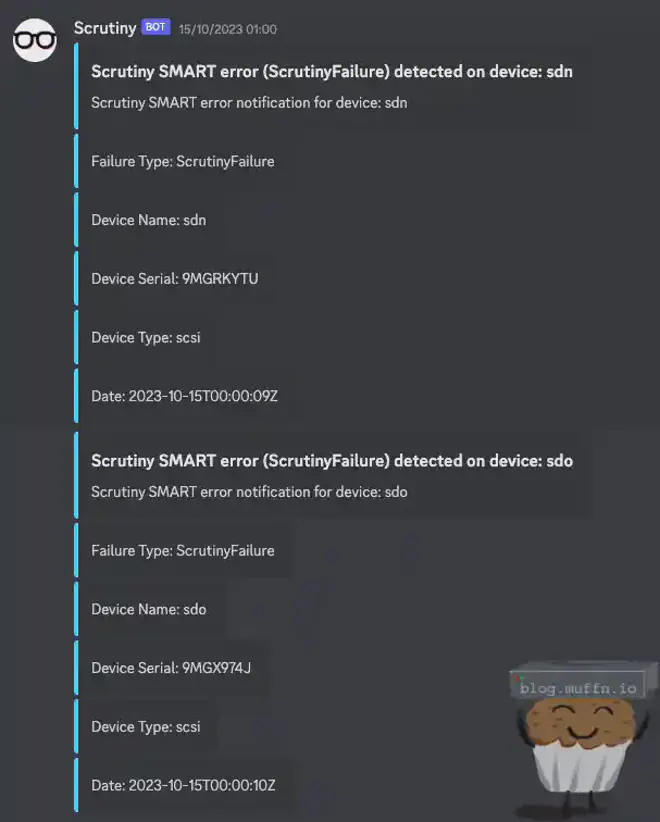
It’s a great tool for ‘at-a-glance’ management of disks and I really do wonder how I managed without such a tool in the past.

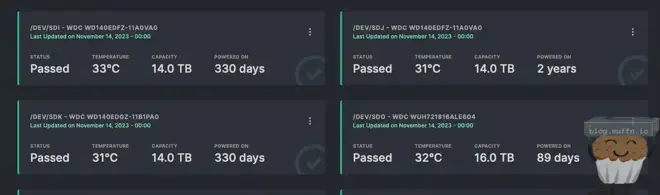
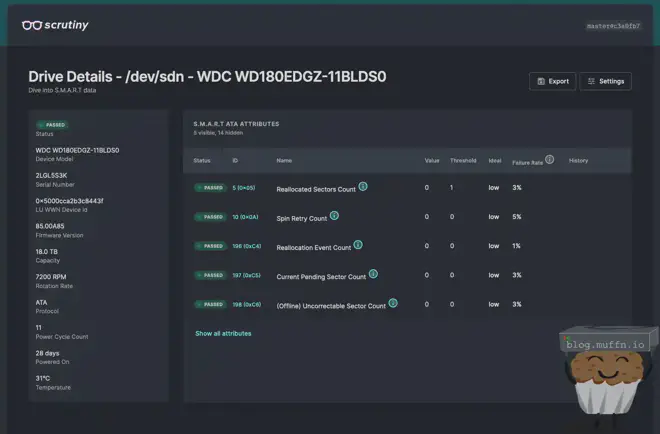
By changing the vars in the ansible role, Scrutiny is deployed with all the config required to monitor all specified disks, and send webhook notifications.
🪂 Todo #
Sync Notifications #
Part of my move from the cloud to local storage meant deleting a lot of stuff. I probably deleted about 70TB of data before the move, and a further 20TB or so afterwards. After doing this local deletion, Snapraid failed its automated sync as it detected too many files had been deleted, indicative of a possible drive failure. I did not know about this until I manually checked.
Snapraid-runner does have the option for email notifications, but this isn’t the 90s. I plan to add functionality to send the status of a sync/scrub to a private Discord channel via a webhook.
Deployment Flexibility #
One flaw which I didn’t see coming until someone asked me about running this themselves is that the Ansible role will not work if you opt to not have a cache disk, or want more than one. This is something I would like to change. It’s possible, but requires unmanagling some dependencies across the configuration and for now, I don’t want to. Along with that change, I will try and make the role as flexible as possible for a range of deployment scenarios.
Project Stacc #
I have a spare Node 804 as explained in my previous post, I want to start the setup to make it into a disk shelf. If you see the post below, hooray for me! If not, I’m still working on it (or have yet to start).
🏆 Conclusion #
Overall, I’m really happy with the setup.
This setup not only achieves space efficiency but also offers flexibility, allowing for easy reconfiguration through simple variable changes. Need to add or remove a disk? Just add it to the variables and run the playbook.
Thanks for following along in this journey, I hope it inspired you and/or taught you something. If you’re interested in doing this yourself, or want to know more about how the deployment works, then please read the 4th and final installment of this series, otherwise, ✌️!
~~muffn_
